

chuliano
-
Posts
22 -
Joined
-
Last visited
Posts posted by chuliano
-
-
Hello, I have a question.
A few years ago I developed a list of automatic prodcutos with coin dollars and pesos (currency of my country) to cubecart 4. my question is, how can I transfer it to cubecart 5 ???
This is the full code
<style> .style_titulos { background-color: #CEDFFF; color: #000; border-color: #FF0000; /*text-transform:uppercase;*/ text-decoration: none; border-width: 0px; background-repeat: repeat-x; font-size: 16px; } .style_activado { background-color: #7C7C7C; color: #FFF; border-color: #000000; border-width: 1px; text-decoration: none; text-indent:10px; font-size: small; } .style_activado a{ text-decoration: none; color: #FFF; } .style_desactivado { background-color: #7C7C7C; color: #B6B6B6; border-color: #000000; border-width: 1px; text-indent:10px; font-size: small; text-decoration: line-through; } .style_desactivado a { text-decoration: line-through; color: #B6B6B6; } a:visited { color: #FFFC; } a:hover { color: #EA9900; } </style> <?php ob_start(); ////////////////////////////////////////////////////// if(!defined('CC_INI_SET')){ die("Access Denied"); } permission("statistics", 'read', true); require($glob['adminFolder'].CC_DS."includes".CC_DS."header.inc.php"); ///////////////////////////////////////// require_once ("ini.inc.php"); // archivo ini, sin zlib.output_compression ini.inc.php propio require_once ("includes".CC_DS."global.inc.php"); require_once ("includes".CC_DS."functions.inc.php"); require_once ("classes".CC_DS."db".CC_DS."db.php"); //////////////////////// // BUILD SUB CATEGORIES //////////////////////// $query = "SELECT productId, ".$glob['dbprefix']."CubeCart_inventory.cat_id, name, cat_name, date_added, price, disabled, sale_price, useStockLevel, stock_level, productCode FROM ".$glob['dbprefix']."CubeCart_inventory INNER JOIN ".$glob['dbprefix']."CubeCart_category ON ".$glob['dbprefix']."CubeCart_inventory.cat_id = ".$glob['dbprefix']."CubeCart_category.cat_id ORDER BY cat_name ASC, price ASC, name ASC"; $db = new db(); $products = $db->select($query); $simbolo = " $"; // pesos $simboloD = " uSs"; // dolares //////////////////////////// // carga monedas require($glob['adminFolder'].CC_DS."includes".CC_DS."cotizacion.inc.php"); // fin moneda //////////////////////////// $coti = $currencies[0]['value']; $PESOS = number_format($coti, 2, ',', ' '); // con solo 2 decimales ///////////////////////////////////////////////////////////// echo "<table width="100%" border="0" cellpadding="3" cellspacing="1" class="mainTable">"; echo "<tr>"; echo "<td colspan="2" class="tdTitle">Estadisticas de productos - precio - stock - valorizado</td>"; echo "</tr>"; echo "<tr>"; echo "<td colspan="2">"; echo "<ul>"; echo "<li><a href="http://www.nickhard.com.ar/tienda/admin.php?_g=stats/index" class="txtLink"><< Volver</a></li>"; echo "</ul>"; echo "</td>"; echo "</tr>"; echo "</table>"; ///////////////////////////////////////////////////////////// echo "<table class="style_titulos" style="width: 100%" border="1" id="Exportar_a_Excel">"; echo "<tr>"; echo "<td class="style_activado" width="100%" colspan="6">LISTADO DE PRECIOS USO INTERNO - Cotización: ".$simbolo." ".$PESOS."</td>"; echo "</tr>"; for ($i=0; $i<count($products); $i++){ if($products[$i]['cat_id']!==$products[$i-1]['cat_id']){ echo "<tr bgcolor="#FFFFE1">"; echo "<td class="style_titulos"> :: ".$products[$i]['cat_name']."</td>"; //echo "<td class="style_titulos">Precio".$simbolo." (Pesos)<h style="color:red" >Oferta</h></td>"; echo "<td class="style_titulos">Precio".$simbolo." (Pesos)</td>"; echo "<td class="style_titulos">Stock</td>"; echo "<td class="style_titulos">Valorizado de stock</td>"; echo "</tr>"; echo "<tr>"; } /////////////////////////////// // COMIENZO DEL IF RPINCIPAL // /////////////////////////////// //////////////////////////////////////////////////// // SI EL STOCK ES 0 ENTONCES NO CREA NINGUNA FILA // //////////////////////////////////////////////////// //echo "<td id="6" style="background-color: #FFFFE1; color: #FF0000; font-weight: bold; font-size: small">".substr(strip_tags($products[$i]['name']), 0, 85)."... (NO/FUERA DE STOCK)"."</td>"; ////////////////////////////////////////////////////////// // COMIENZO SI EL STOCK ES 1 O MAYOR A 1 ENTONCES CREA LAS FILAS // ////////////////////////////////////////////////////////// //////////////////////////// // COMIENZO DEL IF OFERTA // //////////////////////////// // if($products[$i]['disabled']){ if($products[$i]['stock_level']<="0"){ ////////////////////////////////////////// // Fin productos desactivados // si el producto esta desactivado // directamente no se muestra en la lista ////////////////////////////////////////// } else if(!$products[$i]['disabled']){ echo "<td class="style_activado" ><a target="_blank" href="http://nickhard.com.ar/tienda/index.php?_a=viewProd&productId=".$products[$i]['productId']."">".substr(strip_tags($products[$i]['name']), 0, 125)."..."."</a></td>"; // FILA PRODUCTO // solo ver un precio, oferta o fijo. ////////////////////////////////////////// //echo "<td class="style_activado">".$simbolo." ".round($products[$i]['price']*$coti)." (".$simbolo." ".round($products[$i]['sale_price']*$coti).")</td>"; // FILA PRECIO if($products[$i]['sale_price']<="0"){ echo "<td class="style_activado">".$simbolo." ".round($products[$i]['price']*$coti)."</td>"; // FILA PRECIO }else{ //echo "<td class="style_activado" style="color:red">".$simbolo." ".round($products[$i]['sale_price']*$coti)."</td>"; // FILA PRECIO echo "<td class="style_activado">".$simbolo." ".round($products[$i]['sale_price']*$coti)." (Oferta)</td>"; // FILA PRECIO } // solo ver un precio, oferta o fijo. ////////////////////////////////////////// echo "<td class="style_activado">".$products[$i]['stock_level']."</td>"; // FILA PRICE // valorizado if($products[$i]['sale_price']<="0"){ echo "<td class="style_activado">".$simbolo." ".round($products[$i]['price']*$coti)*$products[$i]['stock_level']."</td>"; // FILA PRICE }else{ //echo "<td class="style_activado" style="color:red">".$simbolo." ".round($products[$i]['sale_price']*$coti)."</td>"; // FILA PRECIO echo "<td class="style_activado">".$simbolo." ".round($products[$i]['sale_price']*$coti)*$products[$i]['stock_level']."</td>"; // FILA PRICE } // valorizado /*activado desactivados funciona */ } echo "</tr>"; } echo "</table>"; ////////////////////////////////////////////// ?> <style> .navTitle2 { padding: 0px; font-size: 12px; } </style> -
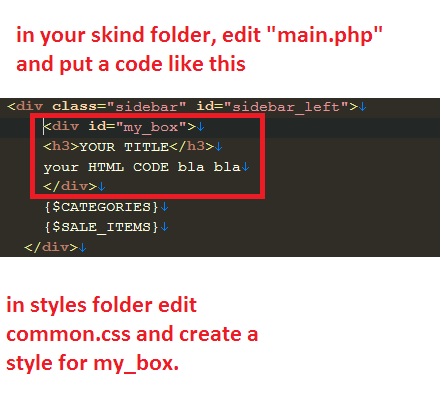
The box will be visible to everyone, and it will be static, no dynamic functioning
the simple way...
-
Please, provide your code to see what you doing wrong. then can we help you more easy!!
-
MOD Admin login random background and MODERN STYLE

Is very simple.
1 - Edit file "adminskinsdefaulttemplateslogin.php" (make backup first)
2 - Download the file in this topic (random background). LINK >https://forums.cubecart.com/topic/49045#n-skin/
3 - Add after this line the next code:
<link rel="stylesheet" type="text/css" href="{$SKIN_VARS.admin_folder}/skins/{$SKIN_VARS.skin_folder}/styles/layout.css" media="screen" />
<!-- CODE HERE -->
LIKE THIS
<link rel="stylesheet" type="text/css" href="{$SKIN_VARS.admin_folder}/skins/{$SKIN_VARS.skin_folder}/styles/layout.css" media="screen" />
<!-- CODE HERE -->
<style>
body {
background : #dddddd url("{$STORE_URL}/js/random_walls.php"); /* link to topic, use the same file random_wall.php */
/*background : #dddddd url("{$STORE_URL}/js/random_walls.php?img=intel_chip-wide.jpg");*/
background-attachment: fixed; background-color: black; background-repeat: no-repeat;
-webkit-background-size: cover;
-moz-background-size: cover;
-o-background-size: cover;
background-size: cover;
}
.preauth-wrapper_new {
background-color: #FFF;
margin: auto;
width: 350px; /* */
height: 180;
padding: 0 0 6px 0;
/* margin-top: 30px; */
/* border-left: 40px solid #F7F7F7; */
/* border-bottom: 40px solid #F7F7F7; */
/* border-right: 40px solid #F7F7F7; */
position: absolute;
top: 50%;
margin-top: -100px;
margin-left: 50px;
border-radius: 5px;
box-shadow: 0 0 1em black;
}
#login-box > h1 {
margin: 7px 0 10px 0;
padding: 5px 10px 5px 10px;
color: #FFF;
font-size: 18px;
background-color: #000;
border-radius: 5px;
text-align: -webkit-center;
font-size: 12px;
}
</style>
In the same file find
class="preauth-wrapper
and replace with this
class="preauth-wrapper_new
Save the file.
Clear cache and DONE!!!
Hope you like it!!!
Comment Please!!
-
insert wallpapers in Kurouto Skin (or other skin, work in every skin)
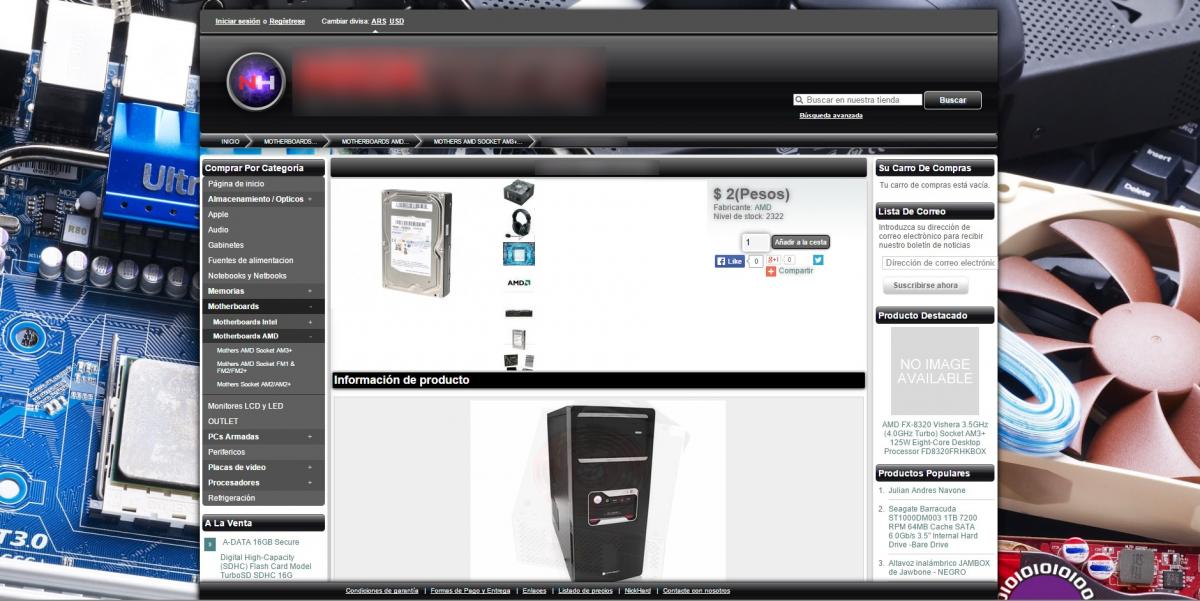
No restrictions on the number of images allowed.
background images are automatically loaded when you enter a new section
First and foremost: backup files. (skinskurouto(ORNAMESKIN)templatesmain.php)
Now get to work:
find and edit the file "skinskurouto(ORNAMESKIN)templatesmain.php"
in line 35 we find:
CODE</script>{/literal}
{/if}
add after:
CODE</script>{/literal}
{/if}
<!-- Fix and centered backgound -->
<style>
body {
background : #dddddd url("{$STORE_URL}/js/random_walls.php");
background-attachment: fixed; background-color: black; background-repeat: no-repeat;
-webkit-background-size: cover;
-moz-background-size: cover;
-o-background-size: cover;
background-size: cover;
}
</style>
Save file and upload
Create the random_walls.php save and upload tu js folder in the root (or wherever you want, remember change the path)
CODE<?php
/*
INSTRUCTIONS
1. Modify the $folder setting in the configuration section below.
2. Add image types if needed (most users can ignore that part).
3. Upload this file (rotate.php) to your webserver. I recommend
uploading it to the same folder as your images.
4. Link to the file as you would any normal image file, like this:
<img src="http://example.com/random_walls.php">
5. You can also specify the image to display like this:
<img src="http://example.com/random_walls.php?img=gorilla.jpg">
This would specify that an image named "gorilla.jpg" located
in the image-rotation folder should be displayed.
That's it, you're done.
*/
/* ------------------------- CONFIGURATION -----------------------
Set $folder to the full path to the location of your images.
For example: $folder = '../images/source/walls';
If the rotate.php file will be in the same folder as your
images then you should leave it set to $folder = '.';
*/
$folder = '../images/source/walls';
/*
Most users can safely ignore this part. If you're a programmer,
keep reading, if not, you're done. Go get some coffee.
If you'd like to enable additional image types other than
gif, jpg, and png, add a duplicate line to the section below
for the new image type.
Add the new file-type, single-quoted, inside brackets.
Add the mime-type to be sent to the browser, also single-quoted,
after the equal sign.
For example:
PDF Files:
$extList['pdf'] = 'application/pdf';
CSS Files:
$extList['css'] = 'text/css';
You can even serve up random HTML files:
$extList['html'] = 'text/html';
$extList['htm'] = 'text/html';
Just be sure your mime-type definition is correct!
*/
$extList = array();
$extList['gif'] = 'image/gif';
$extList['jpg'] = 'image/jpeg';
$extList['JPG'] = 'image/jpeg';
$extList['jpeg'] = 'image/jpeg';
$extList['png'] = 'image/png';
$extList['PNG'] = 'image/png';
// You don't need to edit anything after this point.
// --------------------- END CONFIGURATION -----------------------
$img = null;
if (substr($folder,-1) != '/') {
$folder = $folder.'/';
}
if (isset($_GET['img'])) {
$imageInfo = pathinfo($_GET['img']);
if (
isset( $extList[ strtolower( $imageInfo['extension'] ) ] ) &&
file_exists( $folder.$imageInfo['basename'] )
) {
$img = $folder.$imageInfo['basename'];
}
} else {
$fileList = array();
$handle = opendir($folder);
while ( false !== ( $file = readdir($handle) ) ) {
$file_info = pathinfo($file);
if (
isset( $extList[ strtolower( $file_info['extension'] ) ] )
) {
$fileList[] = $file;
}
}
closedir($handle);
if (count($fileList) > 0) {
$imageNumber = time() % count($fileList);
$img = $folder.$fileList[$imageNumber];
}
}
if ($img!=null) {
$imageInfo = pathinfo($img);
$contentType = 'Content-type: '.$extList[ $imageInfo['extension'] ];
header ($contentType);
readfile($img);
} else {
if ( function_exists('imagecreate') ) {
header ("Content-type: image/png");
$im = @imagecreate (100, 100)
or die ("Cannot initialize new GD image stream");
$background_color = imagecolorallocate ($im, 255, 255, 255);
$text_color = imagecolorallocate ($im, 0,0,0);
imagestring ($im, 2, 5, 5, "IMAGE ERROR", $text_color);
imagepng ($im);
imagedestroy($im);
}
}
?>
finally
From the admin panel> filemanager
Create a folder called walls and climb all the images you want.
delete the cache.
and reload the web!!!
I hope you like!!!Comment Please!!
-
Tigran suppose that you worked for you, smither a solution give to you. But not thank replied. A shame, smither always helping in every post, and few give thanks at least.
-
Lastes Product - Homepage Scroller - MOD jQuery thumbnail scrollerThis is a MOD for "LATEST PRODUCTS" in Homepage, will make display a thumbnail list with a slider of the latest products!!!
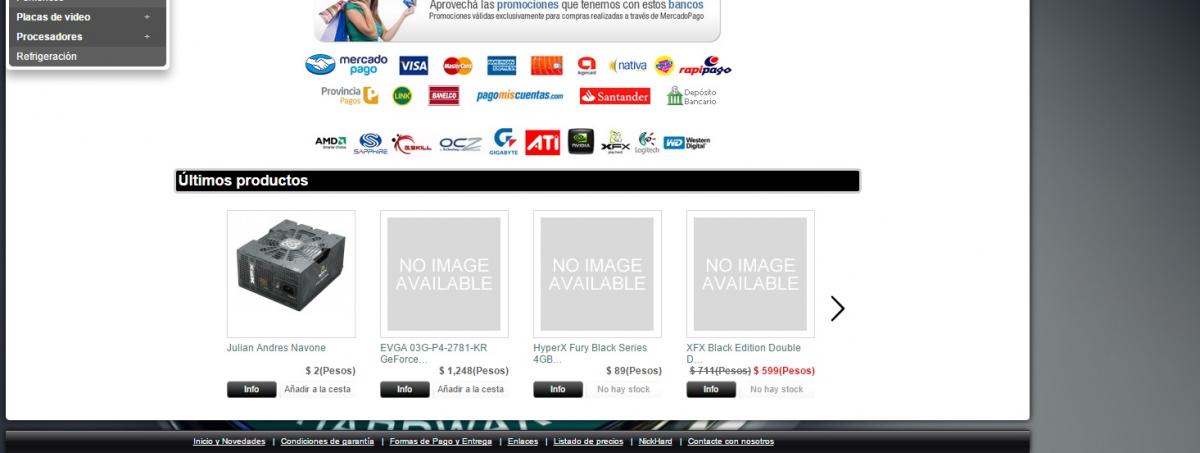 FIRST1 - Downloading plugins from: LINK http://manos.malihu.gr/jquery-thumbnail-scroller/2 - Create a folder in your store, i prefer this location. (for best organization){$STORE_URL}/js/thumbnailscroller/and put in there the plugin thumbnail-scroller-master.3 - Edit file "skinsyourthemetemplatescontent.homepage.php"find this code and add after
{if isset($LATEST_PRODUCTS)}
<!-- PUT HERE -->
Like this
{if isset($LATEST_PRODUCTS)}
    <!-- Custom scroller -->
    <link rel="stylesheet" href="{$STORE_URL}/js/thumbnailscroller/jquery.mThumbnailScroller.css" /> <!-- Create a folder for the plugin ThumbnailScroller jquery -->
    <style>
#my-thumbs-list{
padding: 5px 50px; /* modified as you like */
background-color: transparent; /* modified as you like */
   overflow: auto;
   width: 735px; /* modified as you like */
   height: 250px; /* modified as you like */
   }

</style>
<script src="{$STORE_URL}/js/thumbnailscroller/jquery.mThumbnailScroller.js"></script> <!-- Create a folder for the plugin ThumbnailScroller jquery -->
Save file.
4 - Find this code
  <h2>{$LANG.catalogue.latest_products}</h2>
<!-- PUT HERE -->
  {foreach from=$LATEST_PRODUCTS item=product}
and add put between this
<h2>{$LANG.catalogue.latest_products}</h2>
<!-- this code -->
<div id="my-thumbs-list">
  <ul>
   <li><!-- this code -->
{foreach from=$LATEST_PRODUCTS item=product}
Find this line in the end of file.</form> </div> <!-- HERE --> {/foreach} ​<!-- AND HERE --> </div> {/if}And put between this code or replace for whole code
</form>
  </div>
<!-- THIS CODE -->
<script>
    (function($){
        $(window).load(function(){
            $("#my-thumbs-list").mThumbnailScroller({
              axis:"x", //change to "y" for vertical scroller
              type:"click-100",
              theme:"buttons-out"
            });
        });
    })(jQuery);
</script>
  {/foreach}
<!-- THIS CODE -->
</li>
  </ul>
  </div>
</div> {/if}
and this is all !!!i hope you like it!!Please comment. and if try this please make a suggestion!!!Saludos desde Argentina! -
Update this post!!! Custom scroller to gallery product!
-
OK, first!
CKEditor 4.4.6 ready!
Well, first make a backup of the files and folders.
1 - (includesckeditor) whole, or renamed folder ckeditor_OLD2 - SkinsYourskintemplatemain.phpLets go!3 - Downloading "" and place the folder "includesckeditor"(on file "config.js" can change the settings, language, size, skins, etc, and place more plugins ... remember to make a copy first)4 - Go to the folder "skinsyourskintemplates" and edit the file main.phplooking line 9 about:after this line...
<link rel="stylesheet" type="text/css" href="{$STORE_URL}/js/styles/styles.php" media="screen" />and after that line add this: (this is necessary for jquery slider work properly.)<script type="text/javascript" src="http://ajax.googleapis.com/ajax/libs/jquery/1.7.2/jquery.min.js"></script>
(CLEAR CACHE!!!!)
and that would be all !.NOTE:To add slider look at the new bar ckeditor the "insert slideshow" button in colors and play with!NOTE 2:besides slideshow, you have Youtube, Lighbox, etc!ENJOY!!! -
Yes!!!, I'm working on it.
With jquery and css, putting a button on each end, and hiding the sidebar..When I have ready this modification, I share here! -
If anyone is interested, I can upload an explanation of how to upgrade to the latest version CKEditor Version 4.4.6 with skin "Moono-dark" (and the ability to change skins) and BEST!!!! the possibility of adding a FREE SIMPLE SLIDER anywhere on site documents, Youtube, etc!!!.
Just tell me, and climb the steps.
But ... as I see little participation, or when someone share some mod for free, hardly anyone says, or do not comment if they useful, maybe they do not care.
Just tell me.Just a look, as is!!!
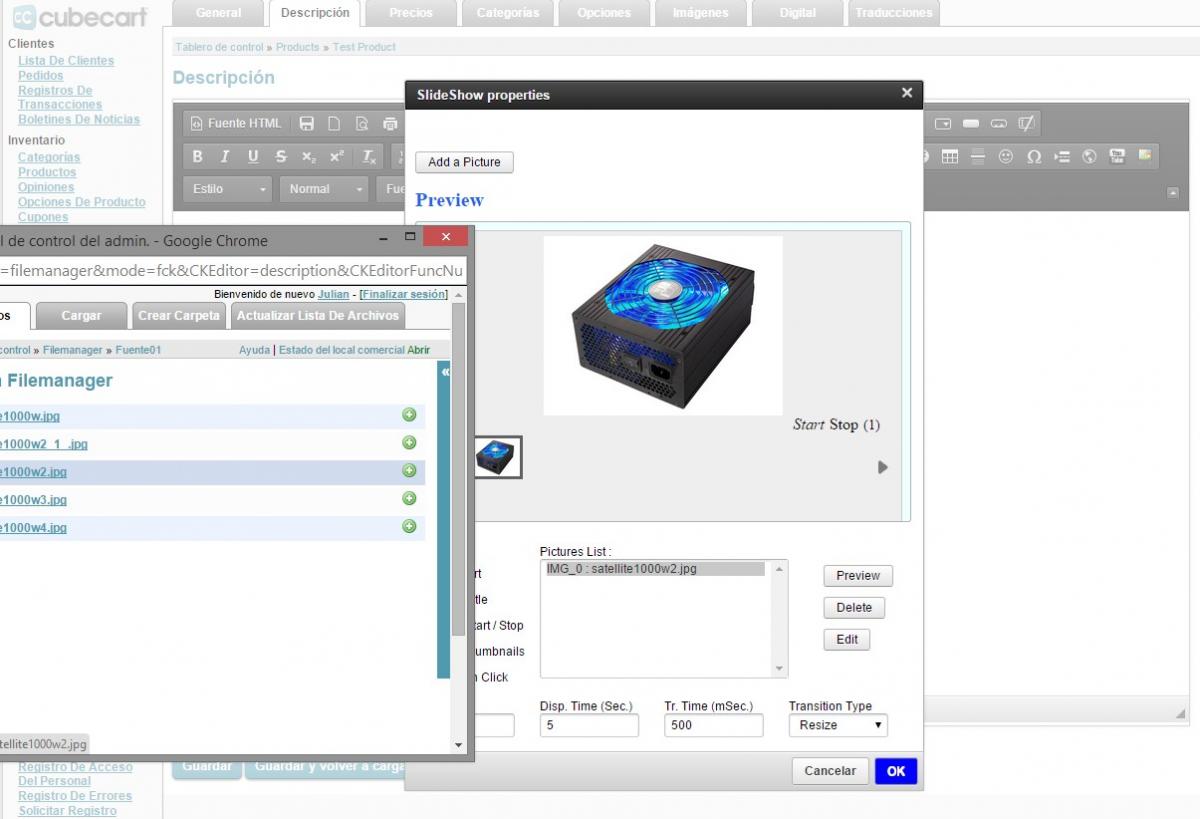
looks like!!
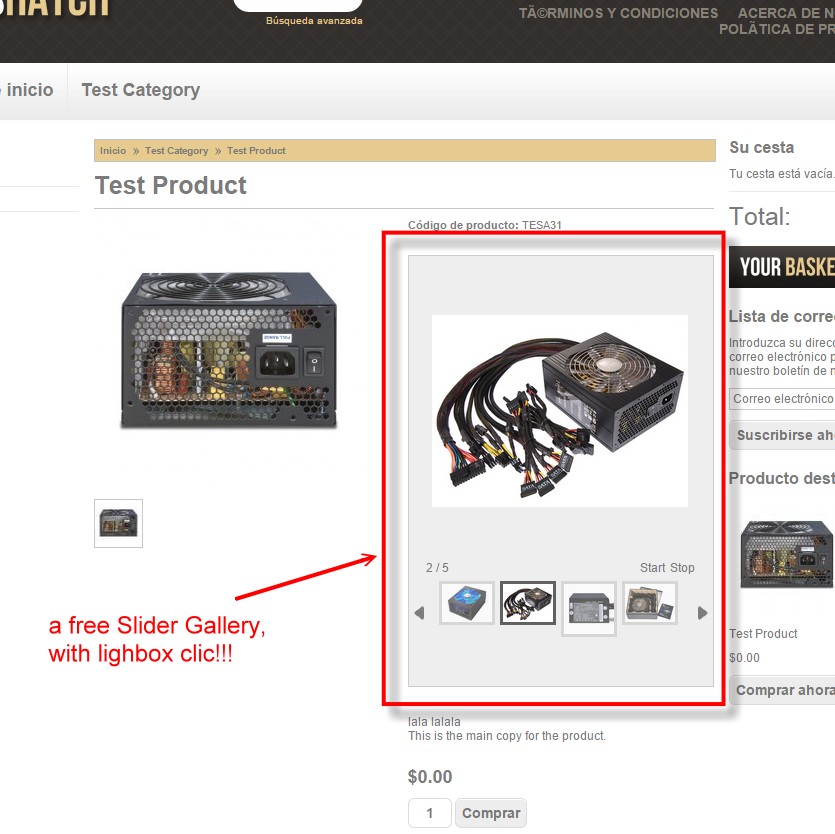
-
Kurouto Skin FIX, gallery to many image
UPDATE 11-12-2014 jQuery custom content scroller
i try to put over 15 images to X product, and the images of gallery go over the div.
this is my solution. (sorry for my bad english)
in the Kurouto Skin "styles" folder,
and Edit file "common.css"
find id "#gallery_select" and replace with this code:
#gallery_select {
   float: left;
   text-align: center;
   width: 80px;
   overflow: auto;
   height: 300px; // height you wish...
}
i hope this is useful for someone. Including the Custom content scroller:Example in skin Kurouto MOD
 1 - Downloading plugins from: LINK http://manos.malihu.gr/jquery-custom-content-scroller/(there have many themes you can use!! LINKS Themes!)2 - Create a folder in your store, i prefer this location. (for best organization){$STORE_URL}/js/customscroller/and put in there the plugin custom scroller.3 - Edit file "skinsyourthemetemplatescontent.product.php"find this code and add before
<script type="text/javascript">
var gallery_json = {$GALLERY_JSON}
</script>
This Code
    <!-- Custom scroller -->    <link rel="stylesheet" href="{$STORE_URL}/js/customscroller/jquery.mCustomScrollbar.css" /> <!-- Create a folder for the plugin custm scroller jquery -->
    <style>
#gallery_select{ height: 300px; width: 80px; }
/*#gallery_select{ height: 80px; width: 580px; }
#gallery{ height: 400px; }*/ /*if you like horizontal gallery */
</style>
    <script src="http://ajax.googleapis.com/ajax/libs/jquery/1.11.1/jquery.min.js"></script><!-- Only if you dont load before -->
    <script src="{$STORE_URL}/js/customscroller/jquery.mCustomScrollbar.js"></script> <!-- Create a folder for the plugin custm scroller jquery -->
<script>
$("#gallery_select").mCustomScrollbar(
{
snapAmount:60,
scrollInertia:100,
     autoHideScrollbar: true,
axis:"y", // axis:"x", if you like horizontal gallery
theme:"inset-2-dark",
advanced:{
autoExpandHorizontalScroll:true
},
scrollButtons:{
enable:true
},
}
);
</script>
    <!-- Custom scroller -->
 <script type="text/javascript">
var gallery_json = {$GALLERY_JSON}
 </script>
wala!
-
yes i try, even try in chrome mode incognito, but still fail.
I will keep trying
-
yes, but still not working

-
Hello, I'm working on a recaptcha upgrade: google recaptcha V2Link information: https://developers.google.com/recaptcha/OKedit the "recaptchalib.php" file in: "includeslibrecaptcha" in line 97 aprox
function recaptcha_get_html ($pubkey, $error = null, $use_ssl = false) { if ($pubkey == null || $pubkey == '') { die ("To use reCAPTCHA you must get an API key from <a href='https://www.google.com/recaptcha/admin/create'>https://www.google.com/recaptcha/admin/create</a>"); } if ($use_ssl) { $server = RECAPTCHA_API_SECURE_SERVER; } else { $server = RECAPTCHA_API_SERVER; } $errorpart = ""; if ($error) { $errorpart = "&error=" . $error; } /*return '<script type="text/javascript" src="'. $server . '/challenge?k=' . $pubkey . $errorpart . '"></script> <noscript> <iframe src="'. $server . '/noscript?k=' . $pubkey . $errorpart . '" height="300" width="500" frameborder="0"></iframe><br/> <textarea name="recaptcha_challenge_field" rows="3" cols="40"></textarea> <input type="hidden" name="recaptcha_response_field" value="manual_challenge"/> </noscript>';*/ return ' <div class="g-recaptcha" data-sitekey="MY_KEY(change my key)"></div> <noscript> <div style="width: 302px; height: 352px;"> <div style="width: 302px; height: 352px; position: relative;"> <div style="width: 302px; height: 352px; position: absolute;"> <iframe src="https://www.google.com/recaptcha/api/fallback?k=MY_KEY(change my key)" frameborder="0" scrolling="no" style="width: 302px; height:352px; border-style: none;"> </iframe> </div> <div style="width: 250px; height: 80px; position: absolute; border-style: none; bottom: 21px; left: 25px; margin: 0px; padding: 0px; right: 25px;"> <textarea id="g-recaptcha-response" name="g-recaptcha-response" class="g-recaptcha-response" style="width: 250px; height: 80px; border: 1px solid #c1c1c1; margin: 0px; padding: 0px; resize: none;" value=""> </textarea> </div> </div> </div> </noscript>'; }edit "controllercontroller.index.inc.php" in line 62 aprox$GLOBALS['recaptcha_keys'] = array('captcha_private' => 'MY_NEW_KEY_PRIV', 'captcha_public' => 'MY_NEW_KEY_PUB');and also this one in the "skin" folder: "templatecontent.recaptcha.php"change everything for this code{if $RECAPTCHA} <fieldset id="recaptcha-title"> <legend>{$LANG.form.verify_human}</legend> {$DISPLAY_RECAPTCHA} </fieldset> {/if}BUT... show the same error text"The verification code was incorrect. Please try again."Anyone know if this is possible to update or can not? -
maybe you should edit the file "gateway.class.php", and replace all the legends that say "default_currency" with "IRN".then look for the line:'amount' => $ this-> _basket ['Total'],add something like the following:'amount' => $ this-> _basket ['Total'] * X.X,where X is the multiplication to convert to USD
-
Hi forum friends, I have a query. I am testing the cubecart 5.2.12 lite to see if I buy it or not. In Argentina MercadoPago use the module, but the module that is included in CC5 does not work with the new API MercadoPago, my question is this.It is possible in a simple way, it adapt these commands??? CLIENT_ID, CLIENT_SECRET, with file "mercadopago.php"
http://developers.mercadopago.com/documentation/receive-payments
Of course, my thanks to anyone who can help -
hello, how can you put lightbox or shadowbox in payment methods, so that there will be any payment method chosen in a lightbox or shadowbox window?
this is possible?
http://www.tubetrucos.com/2012/06/mostrar-cualquier-archivo-en-ventanas.html
-
Hello, I have a problem, my store used as standard currency Argentina Pesos (ARS), and I need to have paypal as a payment option in dollars, in my paypal account only admit payments in dollars, but to make a purchase from CubeCart 4, he says ARS its currency is not accepted by paypal.
Try to "fool Paypal" modifying the transfer.inc.php adding something like this.
if ($ config ['defaultCurrency'] == "ARS") {

$ config ['defaultCurrency'] == "USD";

}
but no, still doing the same, I reject it.
My idea is that by choosing momentarily paypal purchase is made in USD as default, accept paypal for purchase.
Is this possible? which file should be modified?
From already thank you very much!
-
I have problems sending emails to customers from the control panel. do not send the pictures, just text. send.inc.php In this file everything is standard, and also global.in.php this standard.
repeats www.mysite.com (storeURL) in the code which is wrong but do not fix it.
and emails source code
<p><img alt="" src="http://www.mysite.com/imageshttp://www.mysite.com/uploadshttp://www.mysite.com/image_prod1.jpg" width="390" height="341">

</p><p>text blablabla product 1

</p><p><img alt="" src="http://www.mysite.com/imageshttp://www.mysite.com/uploadshttp://www.mysite.com/pruebahttp://www.mysite.com/image_prod2.jpg" width="880" height="800">

</p><p>text blablabla product 2</p>v
these are my files


mysite\admin\sources\customers\send.inc.php
// start email


require "classes".CC_DS."htmlMimeMail".CC_DS."htmlMimeMail.php";


$html		= stripslashes($_POST['FCKeditor']);

$subject	= stripslashes($_POST['subject']);

$fromName	= $_POST['fromName'];

$fromEmail	= $_POST['fromEmail'];

//$returnPath = $_POST['returnPath'];


$htmlcodes	= array("<br />", "<p>", "</p>");

$textcodes	= array("\r\n", "", "\r\n\r\n");

$text		= str_replace($htmlcodes, $textcodes, $html);

$text		= strip_tags($text);

$text		= html_entity_decode_utf8($text);

$html 		= str_replace($GLOBALS['rootRel'],$glob['storeURL']."/",$html);
////////////////////////////// mysite\includes\global.inc.php
<?php

$glob['adminFile'] = 'admin.php';

$glob['adminFolder'] = 'admin';

$glob['dbdatabase'] = 'user_cubecar';

$glob['dbhost'] = 'localhost';

$glob['dbpassword'] = '********';

$glob['dbprefix'] = '';

$glob['dbusername'] = 'user_cubecar';

$glob['encoder'] = 'ioncube';

$glob['installed'] = '1';

$glob['license_key'] = '';

$glob['rootRel'] = '/';

$glob['storeURL'] = 'http://www.mysite.com.ar';

?>

Product List
in Technical Help
Posted
i try, but is very difficult..
https://www.youtube.com/watch?v=MG_tHmL2Oug haha